Overview
For this lab activity, you will login to a workstation running Linux with your personal account.
You will create a folder for storing your work for this course and then create a small text file containing some basic contact information.
You will save that file and email it to the teacher (thomas.rogers@millersville.edu).
These steps are detailed below. Each step is summarized in bold and then described in more detail.
In the second part of the lab, you will type in a Java program and learn to use the Java compiler and runtime system. You will submit this program via AutoLab in order to practice the submit process. This first lab submission will not be graded.
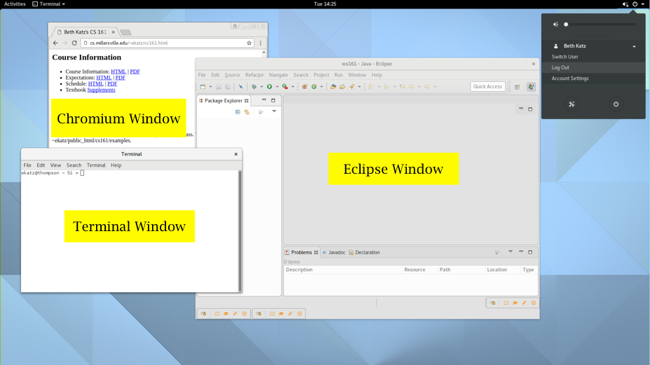
The steps below will help you get your screen to a state similar to the one shown below.
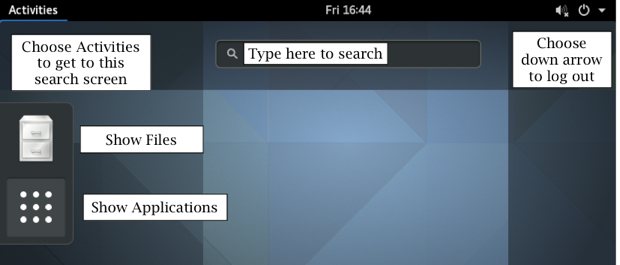
The picture below shows a condensed and labeled version of the search screen.
Using the Linux/GNOME Environment
1. Log in: You should see a login panel asking for your user id. Type your user id. This is your Millersville userid and your Millersville password.
2. Open web browser: Click Activities to bring up the search screen shown above. Click in the search bar and type Chromium and press return to search for that application. Alternatively, you could also press the Windows key, the one to the left of the spacebar with the Windows logo on it.
3. Open course web page: In the web browser, get to our course web page with this URL (uniform resource locator):
http://cs.millersville.edu/~trogers/csci161/
Bookmark the page (Bookmarks > Bookmark this page).
4. Open lab activity: In the web browser, bring up the class "Schedule" and click on the lab activity named Lab Intro (you are probably viewing this now).
5. Open terminal: Although overall this is a graphical interface, for some activities, you will type commands. If you connect to the lab machines over the Internet, you will use a similar terminal interface with typed commands.
On the search screen, click in the search bar and type Terminal.
You will type commands in this terminal window. You may drag the window by its title bar or adjust its size by dragging the lower right corner.
6. Create and open 161 Directory:
In the terminal, type mkdir 161 (with a space between the mkdir and the 161 ). This will create a new directory (folder) named 161 in your home directory (/home/students/). Now type ls (for list directory contents; this is the letter L followed by the letter S , both in lower case) and you will see your new directory in the list. You will create and modify your programs for this class in your 161 directory.
7. Move to 161 Directory in Terminal: The current directory is displayed as part of your terminal prompt:
[userid@machine: ]$
The terminal starts at your home directory every time you start a terminal session or log in. You can tell you're in your home directory when the prompt has a '~' (tilde) as the working directory (between the colon and the dollar sign).
Important Every time you login to work on your programs for this class, you must make sure that the terminal's directory is 161. Do this by typing
cd 161 at the prompt; cd means change directory. You can check where the
terminal is by typing pwd for print working direcctory.
The answer to pwd should be where you were the first time but with /161 on the end.
8. Initializing Eclipse: We will be using the Eclipse integrated development environment (IDE) in this class. To open Eclipse, type eclipse & in the terminal window. The & (ampersand) instructs the operating system (in this case, Linux) to run Eclipse in the background, leaving the terminal free for new commands. Alternatively, you could go to Activities and the search screen to search for Eclipse (not Nsight Eclipse). After you have used them, Eclipse and Terminal will be in your frequently used applications.
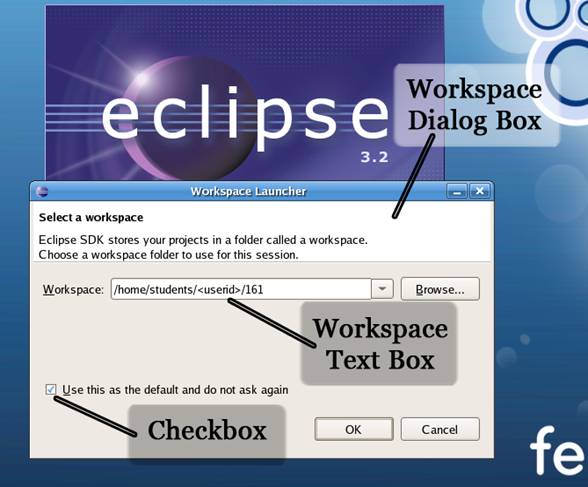
Eclipse will display a window asking for your workspace directory (see picture below from an earlier version of Eclipse; what you see should have similar content).
Delete the word workspace and replace it with 161. The workspace directory should now be /home/students/<userid>/161. Click on the box below which asks if you want to use this as your default workspace directory so that this window is not displayed each time that you open Eclipse.
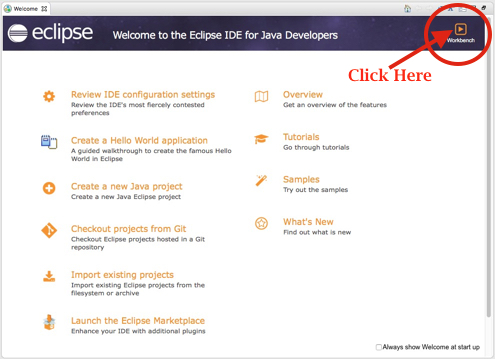
The Eclipse welcome screen (shown below) shows various options and tutorials for using the environment. You may want to explore those later. For now, click the Workbench arrow at upper right.
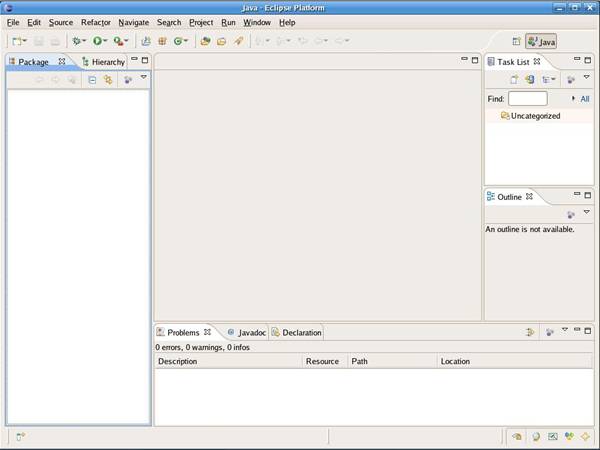
The Eclipse part of your screen should now look much like the screen below.
9. Create an Eclipse Java Project: Create a new Eclipse project by selecting File > New > Java Project. Type MyInfo as the Project Name. In the Project layout portion of the panel, click the Configure Default link. On the new panel, click the Project button under Source and output folder. Click Apply. Click OK. Select the Use project folder as root for sources and class files button. Note that these settings should now be the default for future projects so you will not have to repeat this. But it is a good idea to check to see that this button is correctly selected each time. Finish the project creation by clicking the Finish button at the bottom of the window.
Now, create a new text file by selecting File > New > Untitled Text File from the Eclipse menu. This will create a blank text file that will be opened in an editor pane in the middle of the Eclipse workbench. Your cursor will automatically move to the top of the blank editor pane. Type your name and list the reasons you are taking this class. If your only reason is because the class is required, describe why you think it's required. Also indicate what you currently know about programming and computer science. Feel free to share something interesting about you as well. Proofread your typing. You can use the mouse to move around. Save the file using File > Save As to save and name your file. Select MyInfo in the white middle pane so that it is displayed as the parent folder. Enter myinfo.txt as the File name. Be sure to include the .txt extension. Click the OK button. Go back to your terminal window (if you closed it earlier, open a new one). In the terminal window, verify that you are in the 161 directory. Type ls and you will see your new MyInfo project directory which will contain any files associated with the project. Type cd MyInfo to enter the MyInfo directory. Type ls again and you will see your myinfo.txt file.
To display the contents of your myinfo.txt file, type cat myinfo.txt. You could also type part of the file name (as in cat my) and then hit the TAB key to complete the file name.
10. Develop your first Java Lab (HelloWorld): The instructions for the Java lab (not graded) are here: HelloWorld
|
Practice Some Terminal Commands:
Learning a few terminal (Unix bash shell) commands will make it easier for you to use the system. You'll learn these commands as time goes by. You will use the terminal to compile your programs, and if you are connecting to these machines from outside the lab, you will get a terminal when you connect.
In the terminal, type the commands in the left column. The right column describes what you are doing. When you complete that series of commands, you should be back at your 161 folder. If not, figure out how to get there. Remember that you always need to move the terminal into ~/161 to work on files for this course. |
|
Log Out: First, ensure that you do not turn off the machine. Other students in other courses need to use them too! You are only going to log out, not shut off the machine. In the upper right corner of the screen, click the power icon. Then click in the area that displays your full name. A drop down menu with Log Out will become visible. Click Log Out. You are logged out when you see the login panel on the screen. Any time you leave the lab, save any work and log out. You will log back in for the second part of the lab.
Accessing the Linux lab remotely: